RoofViews

Building Science

Edge Metal Design Wall Zones 4 and 5

By James R Kirby

April 19, 2019

Edge metal

Keeping water out of a building is undoubtedly the primary function of a roof system. But one could argue that ensuring a building's roof stays in place during high-wind events is equally important. Let's face it, without a roof, it's hard to keep water out! This blog takes a look at one of the subsets of wind design of roof systems: Wall Zones 4 and 5 and their relationship with roof perimeters.

Introduction

Architects, specifiers, and roof system designers are generally focused on the wind-uplift capacity of the roof system itself. Wind resistance of perimeter edges and parapets might not be front of mind, especially given the myriad roof-system Approval Listings that can be found through DORA, FM, and UL. However, rooftop perimeters and corner areas are most vulnerable to high wind, and perimeter edge metal and copings are part of the first line of defense. Codes now include wind-design and system testing for edge metal and copings. FM also just recently (late 2021) updated RoofNav's Wind Rating Calculator to include fascia, copings, and gutters.

Edge metal and copings

The term 'edge metal' encompasses three foundational shapes that are used at a roof's perimeter: L-shaped metal, gravel stop metal, and copings for parapets. The figures below show generic shapes; ones that are often contractor-fabricated. Additionally, there are many manufacturers that provide edge metal. Some of the manufacturer-fabricated shapes are similar to those shown below. However, some are a bit more distinct and some are extruded to achieve more unique shapes.

Graphic adapted from National Roofing Contractors Association

Some examples of GAF's metal details are shown here:

Steel and aluminum are common materials used for edge metal shapes and copings. Some are galvanized; some are painted. Commonly used thicknesses range from 20 gauge to 24 gauge for steel and 0.032" to 0.040" for aluminum. The continuous cleat is typically one gauge thicker than the edge metal and coping.

Why is wind design of edge metal important?

The roofing industry has been investigating high-wind events, primarily through a group called the Roofing Industry Committee on Weather Issues (RICOWI). RICOWI was established in 1990 and has published numerous reports based on post-wind-event investigations of damage caused by hurricanes. RICOWI's most recent report, released November 19, 2019, covers their investigation of the damage caused by Hurricane Michael. RICOWI has published five reports covering their investigations of 6 hurricanes since 2004.

One of the most consistent conclusions throughout the series of 5 reports of post-event investigations is that the majority of localized roof damage and roof system failures due to high winds commonly begin at perimeters and corners. This is not surprising as the highest wind loads are at rooftop perimeters and corners. This blog about wind design and ASCE-16, among other topics, discusses the process and factors used to determine wind loads, and it provides additional information about roof zone layout.


Localized roof damage and roof system failures due to high winds commonly begin at perimeters and corners.

Not recognizing the importance of edge metal design relative to the overall wind performance of a roof system can result in edge metal installations that may not have the appropriate wind-resistance capacity. This could possibly result in localized damage and/or system failures, even when the roof system (i.e., deck, insulation, membrane) is appropriately designed for design wind loads.

The following information is intended to supplement the wind design concepts that were discussed in GAF's earlier blog about wind design and ASCE 7-16.

Roof and Wall Zones

Wind design of metal edges and copings includes an upward and an outward component, unlike the primary roof system which includes an upward component only. (The Edge Metal Testing section of this blog has more information on that topic). ASCE 7 calls the outward pressures acting on metal edges and copings Wall Zones 4 and 5. Wall Zone 4 correlates and is aligned with Roof Zone 2 (the perimeter zones), and Wall Zone 5 is aligned with Roof Zone 3 (the corner zones). The figure shows one example of a building's roof and wall zones. Case studies from this blog provide more specific information related to the figure below.

Roof and Wall Zone

What do the codes say?

The International Building Code (IBC) includes requirements for determining the wind-load capacity for metal edges and copings. This requirement has been included since the 2003 version of the IBC. In other words, edge metal and copings should have wind-resistance capacities greater than the design wind pressures. This concept is just like wind design for the primary roof system—the capacity of the system needs to be greater than the anticipated loads.

Chapter 15, Section 1504.5 from the 2015 IBC includes requirements for determining the capacity of metal edges and copings.

"1504.5 Edge securement for low-slope roofs. Low-slope built-up, modified bitumen and single-ply roof system metal edge securement, except gutters, shall be designed and installed for wind loads in accordance with Chapter 16 and tested for resistance in accordance with Test Methods RE-1, RE-2 and RE-3 of ANSI/SPRI ES-1, except Vu1t wind speed shall be determined from Figure 1609A, 1609B, or 1609C as applicable."

Chapter 16 of the IBC indirectly includes requirements for determining the wind loads acting on metal edges and copings. In Section 1609.1 Applications, the IBC states "Buildings, structures and parts thereof shall be designed to withstand the minimum wind loads…" The "parts thereof" encompasses metal edges and copings. The requirement in Chapter 15 to design and install metal edges and copings means the outward pressures for Wall Zones 4 and 5 need to be determined.

It's worth noting that the scope of the ANSI/SPRI ES-1 test method does not include gutters, which is why gutters are specifically excluded in the code language through 2018. However, SPRI, in 2016, published ANSI/SPRI GT-1, Test Standard for Gutters, which was first included in model codes in the 2021 IBC.

Edge metal testing

Determining the design wind pressures (in pounds per square foot) for Wall Zones 4 and 5 is generally the responsibility of the design professional, such as the architect or structural engineer. On the other hand, determining the capacity of metal edges and copings is generally the responsibility of the manufacturer, which may be a manufacturing company or a roofing contractor that fabricates their own metal edges, coping, and clips and cleats.

The IBC specifically lists ANSI SPRI ES-1, Test Standard for Edge Systems Used with Low Slope Roofing, as the test method to be used to determine capacity for metal edges and copings. ES-1 includes three (3) test methods (RE-1, RE-2, RE-3), each for a different edge condition.

  • The RE-1 test method is for 'dependently terminated roof membrane systems'. Essentially, a mechanically attached or ballasted membrane is considered to be dependently terminated if a "peel stop" or row of fasteners is not included within 12" from the roof edge. Without a peel stop or a row of fasteners close to the edge of the roof, the edge metal is acting as the mechanical attachment of the perimeter of the membrane. (The RE-1 figure below is rotated clockwise 115 degrees to show the as-tested configuration of the metal edge. ES-1 presumes a ballasted or mechanically attached membrane will flutter and apply load to the metal edge at 25 degrees. The rotated configuration accommodates a hanging load.)

  • The RE-2 test method is for essentially all metal edge types as long as the "horizontal component" is 4" wide or less.

  • The RE-3 test method is for copings, and RE-3 includes two tests. One test includes an upward load and a 'face' load; the second test includes an upward load and the 'back leg' load.

The wind-resistance capacity of metal edges and copings is provided in "pounds per square foot" (psf). This is appropriate because the design wind pressures are also in PSF values which makes the comparison of design wind pressures to wind-resistance capacity simple.

Where to find Approval Listings for edge metal

Similar to approval listings for roof systems, there are approval listings for metal edges and copings. Approval Listings are found on FM's RoofNav and UL's Product IQ. An account (free) is required for both. Additionally, NRCA has Approval Listings for contractor-fabricated metal edges and copings which are housed on UL's Product IQ and Intertek's Directory of Building Products.

UL

Knowing UL's Category Control Number is key to navigating UL's Product IQ. . For metal edges and coping, UL's Category Control Number is "TGJZ". After logging in, performing a search using "TGJZ" provides a list of the manufacturers that have Approval Listings with UL. Clicking on GAF's Approval Listings allows users to easy find rated Roof-edge Systems, Metal, for Use with Low-slope Roofing Systems.

Within UL's TGJZ category, GAF has 16 metal-edge products rated using the RE-2 test method and 8 coping products rated using the RE-3 test method. For example (as shown in item 3 in the screen capture above), GAF's M-Weld Gravel Stop MB Fascia B made with aluminum is rated "190 psf". That means this product can be used when the design wind pressures, which include a safety factor, for Wall Zones 4 and 5 are less than or equal to 190 psf.

FM's RoofNav

Within RoofNav, Approval Listings for metal edges and copings can be found under "Product Search" using the "Flashing" category. Most likely, users of RoofNav are familiar with the "Assembly Search" function which is regularly used to locate roof systems based on their wind-uplift ratings.

The search can be further refined within "Subcategory" by selecting Expansion Joint, Gutter, or Perimeter Flashing.

Currently, GAF has 59 Approval Listings in RoofNav: 12 for Coping, 41 for Fascia, and 6 for Gutter products. A screen capture from RoofNav shows GAF's first 20 products.

Looking closely at the Listing, the EverGuard EZ Fascia AR – Steel provides detailed information about the product itself and the installation requirements. As shown below, the listing includes multiple Ratings (i.e., wind-uplift capacity) based on material type and thickness, and face height.

While the Listing is for a steel fascia, an aluminum fascia is also shown in the detailed information. It's important to note that the chart with the "steel" listing's detailed information is the same chart that is available for EverGuard EZ Fascia AR – Aluminum, as well. Therefore, it's prudent for designers and specifiers to provide appropriate information in the specification to avoid mis-communiction about intended product use.

Take note of the material and gauge of the "retainer" (i.e., the continuous cleat). The continuous cleat is required to be 0.50 aluminum, regardless of fascia material type for this Listing. Because the strength of the cleat is a significant factor to the overall wind-uplift capacity of the metal edge (or coping), increasing the thickness of the cleat proves to be an effective method to increase performance.

FM RoofNav and Edge Securement

FM announced on its website on October 28, 2021 that "The Wind Ratings Calculator has been updated to return separate flashing ratings for roofs." The red-highlighted area shows the required capacity for Fascia, Coping, and Gutter products.

Comparison of the Minimum Wind Uplift Approval Ratings Needed (1-75, 1-90) to the Perimeter and Corner Ratings of the EverGuard EZ Fascia shows that each product type provides the required capacity, and in most cases the required capacity greatly exceeds the required rating.
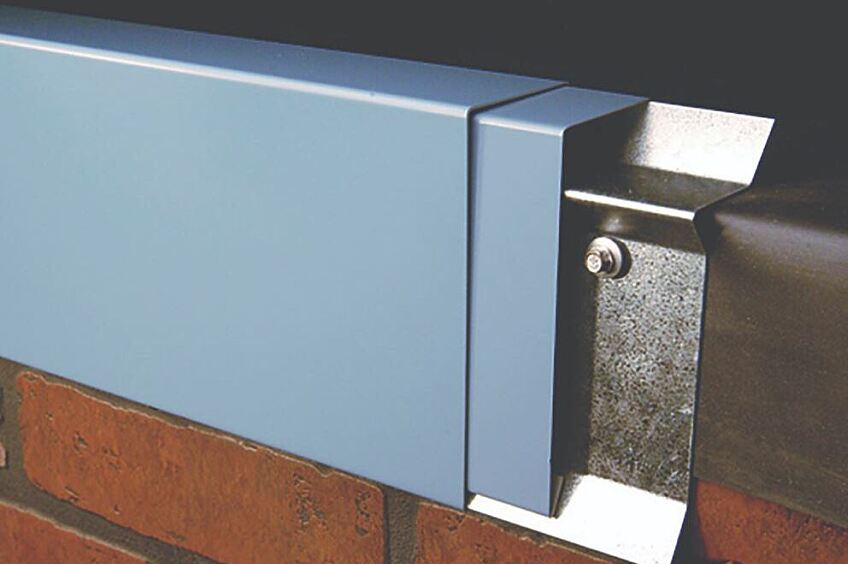
Load Path

The 3 test methods included in ANSI/SPRI ES-1 standard determine the wind-resistance capacity of edge metal attached to a substrate. In other words, the measured capacity (Rating) is of the metal edge or coping attached to the wood blocking; the tests do not measure the capacity of the attachment of the wood blocking to any substrate. The National Roofing Contractors provide information on this topic. The NRCA Roofing Manual: Membrane Roof Systems—2019, on page 289 states:

"Wood Nailers and Blocking: Many of the construction details illustrated in this manual depict wood nailers and blocking at roof edges and other points of roof termination. Wood nailers must be adequately fastened to the substrate below to resist uplift loads. This especially is true at parapet walls/copings and roof edges where edge-metal shapes are fastened to wood blocking.

Among other advantages, the nailers provide protection for the edges of rigid board insulation and provide a substrate for anchoring flashing materials. Wood nailers should be a minimum of 2 x 6 nominal-dimension lumber. To provide an adequate base, nailers should be securely attached to a roof deck, wall and/or structural framing. In the design of specific details for a project, a designer should describe and clearly indicate the manner in which wood nailers and/or blocking should be incorporated into construction details. A designer should specify the means of attachment, as well as the fastening schedule for all wood nailers and blocking."

To that end, FM Global Property Loss Prevention Data Sheet 1-49, Perimeter Flashings, provides a number of recommendations for anchoring wood blocking to various types of walls and structural framing. One example of a roof/wall intersection shows the bottom nailer bolted to the bar joists to ensure an adequate load path.

In Summary

Architects, specifiers, and roof system designers are required by code (always check specific local requirements) to determine wind loads not only for the primary roofing system, but for the metal edges and copings as well. Manufacturers and fabricators are responsible for determining the wind-uplift capacity of their metal edge and coping products, as well as their primary roofing systems.

Given the relatively new requirements in the IBC for edge securement, designers, consultants, and specifiers should become familiar with both UL's and FM's approval listings for metal edges and copings. Manufacturers of metal edge and coping products are available to assist designers with selection of edge securement.

About the Author

James R. Kirby, AIA, is a GAF building and roofing science architect. Jim has a Masters of Architectural Structures and is a licensed architect. He has over 25 years of experience in the roofing industry covering low-slope roof systems, steep-slope roof systems, metal panel roof systems, spray polyurethane foam roof systems, vegetative roof coverings, and rooftop photovoltaics. He understands the effects of heat, air, and moisture movement through a roof system. Jim presents building and roofing science information to architects, consultants and building owners, and writes articles and blogs for building owners and facility managers, and the roofing industry. Kirby is a member of AIA, ASTM, ICC, MRCA, NRCA, RCI, and the USGBC.

Related Articles

Commercial Roof
Building Science

IBC and FM—What's the Difference When it Comes to Wind Design?

IntroductionWind design of roof systems can be confusing from an engineering perspective. Wind design can also be confusing because the International Building Code (IBC) provides specific requirements, but so does Factory Mutual (FM). If FM is specified, do the IBC requirements need to be followed? What is the wind-design strategy for FM-insured and non-FM-insured buildings? This blog will discuss the following:IBC is a model code; FM is an insurance companyCompliance with the local building code is a legal requirement; FM is elective (a building owner has the ability to select their insurance carrier)IBC references the ASCE 7 standard; FM provides wind-design methodology via the Ratings Calculator and Assembly Search functions within RoofNavFM-insured buildings must comply with both the IBC and FM requirementsSpecifying "FM" could trigger the "FM process" unknowingly for non-FM insured buildingsWhat is the issue?In roofing specifications, architects have been referencing Factory Mutual (FM) for many decades, especially when it comes to wind design of commercial roofing systems. "Meet FM requirements," "Provide a 1-90 roof system," or just simply "Meet FM" are phrases inserted into specifications. Do these phrases supplant the need to follow the wind-design requirement of the International Building Code (IBC)? (Spoiler alert: The answer is a resounding "NO".)The BasicsThe IBC is a model code, developed by the International Code Council. A model code, such as the IBC, is intended to be adopted by municipalities (e.g., state, city) as the locally enforced building code. The model code can be adopted as-is, or with language removed, with language added, or both. The local building code is enforced through local building code officials. And, very importantly, meeting the local building code is a legal requirement and there can be ramifications when the local building code is not met.Commercial buildings are required to meet the IBC as adopted and amended by the local jurisdiction. For wind design, the IBC requires a roof system be designed based on ASCE 7, Minimum Design Loads for Buildings and Other Structures. (More on the specifics later.)FM Global is an insurance company and a purveyor of design and installation documents for roof systems (e.g., Loss Prevention Data Sheets 1-28, Wind Design). FM Approvals is a testing facility, a third-party certification body, and a developer of Approval Standards (e.g., FM 4470, Single-Ply, Polymer-Modified Bitumen Sheet, Built-Up Roof (BUR) and Liquid Applied Roof Assemblies for use in Class 1 and Noncombustible Roof Deck Construction). FM Approvals also maintains RoofNav (www.RoofNav.com), which provides access to FM Approved roofing systems and related installation recommendations from FM Global. RoofNav is likely the FM tool that is frequently used by architects and roof system designers who are searching for and selecting approved roof systems. This is why many architects and specifiers include some reference to FM in roof system specifications.IBC Wind Design MethodModel building codes, such as the 2018 IBC, when adopted by a local jurisdiction, become the legal requirements for construction. The IBC specifically states, "The I-Codes, including this International Building Code, are used in a variety of ways in both the public and private sectors. Most industry professionals are familiar with the I-Codes as the basis of laws and regulations in communities across the U.S. and in other countries." A more succinct way of stating this is—the local building code is the law.Within the IBC, the building code requirements for roofing and rooftop construction are found in Chapter 15, Roof Assemblies and Rooftop Structures. Section 1501.1, Scope, states "The provisions of this chapter shall govern the design, materials, construction and quality of roof assemblies, and rooftop structures." Wind resistance of roof systems is included in Section 1504, Performance Requirements, and Section 1504.1, Wind resistance of roofs, requires roofs be designed for wind loads according to Chapter 16, Structural Design.Section 1609, Wind Loads, incorporates by reference the standards set forth in ASCE 7; this section includes the following language."1609.1.1 Determination of wind loads. Wind loads on every building or structure shall be determined in accordance with Chapters 26 to 30 of ASCE 7."It's worth noting that the version (i.e., year of publication) of ASCE 7 is not specified in the body of the code; versions of referenced standards are found in Chapter 35.The key point is that the IBC directs users to ASCE 7 to determine design wind pressures (DWP) for roof systems.To continue a bit deeper into the 2018 IBC, Section 1504.3 is the directive to designers to design roofs to resist design wind pressures."1504.3 Wind resistance of non ballasted roofs. Roof coverings installed on roofs in accordance with Section 1507 that are mechanically attached or adhered to the roof deck shall be designed to resist the design wind load pressures for components and cladding in accordance with section 1609.5.2."It's important to recognize that Section 1504.3 specifically ties the wind design of nonballasted roofs to ASCE 7 by referencing a subsection of Section 1609.Additionally, Section 1504.3.1 is the directive to manufacturers to test roof systems to determine wind uplift capacity."1504.3.1 Other roof systems. Built-up, modified bitumen, fully adhered or mechanically attached single-ply roof systems, metal panel roof systems applied to a solid or closely fitted deck and other types of membrane roof coverings shall be tested in accordance with FM 4474, UL 580 or UL 1897."This section provides 3 code-approved test methods to choose from to perform wind-uplift-capacity testing.FM 4474, American National Standard for Evaluation of Simulated Wind Uplift Resistance of Roof Assemblies Using Static Positive and/or Negative Differential PressuresUL 580, Standard for Tests for Uplift Resistance of Roof AssembliesUL 1897, Standard for Uplift Tests for Roof Covering SystemsThese tested systems are found in Approval Listings from organizations like FM, UL, and SPRI. These two videos provide more information about FM Approval's RoofNav and SPRI's Directory of Roofing Assemblies.What's NOT Stated in the IBCNothing in the model code sections referenced here or any other related model code sections within IBC contains a provision that allows a wind-design method other than ASCE 7 to be used. In other words, using FM's RoofNav for wind design of roof systems is not a replacement for following building code requirements that mandate the use of ASCE 7. Of course, designers should always check with the specific requirements of the local building code to determine if the use of FM's RoofNav is allowed for code compliance.FMWe've established that FM Global is an insurance company that provides installation recommendations and FM Approvals provides design information, as well as FM-approved listings. In order to receive an FM Approval Listing, a roof system must be tested in accordance with FM 4470, Single-Ply, Polymer-Modified Bitumen Sheet, Built-Up Roof (BUR) and Liquid Applied Roof Assemblies for use in Class 1 and Noncombustible Roof Deck Construction.FM 4470 includes a battery of tests intended to help determine the long-term performance of a roof system (clearly an important issue for an insurance carrier!).FM 4470 includes the following mandatory tests to be performed:Combustibility (from above and below the roof deck)Wind uplift (FM 4474 is the test method used to determine wind uplift capacity)Hail resistanceWater leakageFoot trafficCorrosionSusceptibility to heat damageFM 4470 also includes requirements for a manufacturer's in-house quality control program that includes an audit program, field inspections during installation, and additional manufacturer responsibilities if products' construction or components are revised.The use of FM 4470 results in a roof system with a "1-60" or "1-75" listing, for example. The "1" represents the roof system is Class 1 for fire resistance (combustibility) from below the deck. The second (e.g., 60, 75) represents the wind-uplift capacity (in pounds per square foot) of the roof system.It is important to recognize that FM 4470 is not listed as one of the test methods for wind-uplift capacity in the 2018 IBC, which means the IBC does not require a roof system to be FM-approved!FM 4474, American National Standard for Evaluation of Simulated Wind Uplift Resistance of Roof Assemblies Using Static Positive and/or Negative Differential Pressures, is a test method to determine wind uplift capacity of roof systems. As noted previously, FM 4474 is the wind-uplift test method that is required to be used within FM 4470 for an FM Approval Listing.FM-insured buildingsBuildings that are FM insured are commonly required by FM to use a roof system that has an FM Approval Listing. More specifically, roof systems intended to be used on FM-insured buildings should use RoofNav to determine wind loads (via the RoofNav Ratings Calculator) and find Approved roof systems (via the RoofNav Assembly Search).Non FM-insured BuildingsTo broadly say "Meet FM" or "Meet FM requirements" in a spec could be interpreted to mean—for non-FM insured buildings—that the wind-design process, deck securement, and roof system installation should follow ALL of the specific FM processes and recommendations that are used for FM-insured buildings.As the architect or specifier working on a building that is not insured by FM, is the vague specification language truly intended to bring the entire "FM process" into the wind design and installation of a roof system? Probably not. It is more likely the vague specification language referencing FM is intended to be a way to state that the assembly must meet local building code requirements for wind design.Saying "Meet FM" or "Meet FM requirements" does not preempt or override the requirements of the IBC, as adopted by local building code, that are legally required to be performed by the Architect of Record when it comes to wind design of roof systems. (Additional information about code requirements for wind design can be found here.)ConclusionThe IBC, as adopted by local building codes, is required by law and references ASCE 7 as the standard to be used for determining design wind pressures for roof systems. The IBC does not include FM's wind-design process (e.g., RoofNav's Ratings Calculator and Assembly Search functions) for determining DWPs. Vague specification language referencing FM may unnecessarily bring the FM wind-design process into play.The IBC also provides 3 test methods for determining wind-uplift capacity of roof systems—UL 580, UL 1897, and FM 4474. It is important to recognize that FM 4474 is a test method used by manufacturers to determine wind-uplift capacity, and FM 4470 is a comprehensive standard covering many aspects of roof system performance. Specifying and only using FM's wind design process in lieu of following the wind-design requirements in IBC, as adopted by local building code, means the minimum legal requirements for wind design technically may not have been met.Understanding the roles that IBC and FM play in the roofing industry is key to understanding the role of the architect or specifier, and the manufacturer when it comes to wind design of roof systems.This blog is for informational purposes only and is not intended to be construed or used as professional design advice. Consult a design professional to ensure the suitability or code compliance of a particular roofing system for any particular structure.

By Authors James R Kirby

July 16, 2021

GAF Cedar City plant
Building Science

How will ASCE 7-16 affect the low-slope roofing industry? A Tale of Two Buildings

A common question being asked in the roofing industry is whether or not the 2016 version of ASCE 7 is going to increase the design wind pressures acting on a building. The answer is "yes" in many cases. So, the follow up question is "by how much?" And, that leads to the next question, "how much more capacity will roof systems be required to have when wind design follows ASCE 7-16?"This blog looks at 2 buildings of different sizes and heights in two cities in the U.S., one centrally located and one along the Gulf coast, and compares design wind pressures based on ASCE 7-10 and ASCE 7-16. By assessing the required roof-system capacity for all roof zones in conjunction with the increases in the size of roof zones, we can begin to put some real numbers to the question "by how much will ASCE 7-16 affect the low-slope roofing industry?"While analysis of two building types in two cities doesn't represent a significant study, this study offers an example of how the 2016 version of ASCE 7 is going to affect installed roofing systems over the next decade.Case StudiesDesign wind pressures (DWP) were determined for two building types in two cities. DWPs were based on varying the Risk Category and Exposure. The following table shows the building types, cities, variables, and constants.The big box store is 290' long x 169' wide x 24' tall, and the apartment building is 100' long x 40' wide x 55' tall. Wind speeds were determined using an online tool.DWPs can be determined by using proprietary third party methods (e.g., RoofNav), simplified calculation tools (e.g., RoofWindDesigner), or hand calculations following the methods within the ASCE 7 standard.For this case study, DWPs were determined using hand calculations via an Excel spreadsheet. The DWPs are slightly more refined since there was no rounding of wind speeds for ASCE 7-16. Both RoofNav and Roof Wind Designer round to the nearest 5 or 10 mph. The maps in ASCE 7-16 have been revised, not only from a wind speed perspective but from the number of wind isobars on the maps. The ASCE 7-16 maps are more refined which allows for more exact wind speed values.ASCE 7-10 Map, Risk Category II, showing a limited number of wind-speed isobars.ASCE 7-16 Map, Risk Category II, showing many additional wind-speed isobars relative to the ASCE 7-10 wind map shown in the above figure.In total, 72 different sets of DWPs were calculated. Buildings over 60' tall are designed the same in ASCE 7-16 as in ASCE 7-10; therefore, this article focuses on buildings less than 60' tall.Design Wind Pressure ResultsThe following charts provide the DWPs for each of the scenarios that were analyzed for this article.Design wind pressures based on ASCE 7-10 and ASCE 7-16 for a big box store in Kansas City, MO that is 24' tall.Design wind pressures based on ASCE 7-10 and ASCE 7-16 for a big box store in Mobile, AL that is 24' tall.Design wind pressures based on ASCE 7-10 and ASCE 7-16 for a 5-story apartment building in Kansas City, MO that is 55' tall.Design wind pressures based on ASCE 7-10 and ASCE 7-16 for a 5-story apartment building in Mobile, AL that is 55' tall.Comparing the 2010 and 2016 versionsThe primary intent of this article is to start generating data to help answer the question "how much did the DWP increase from the 2010 version to the 2016 version of ASCE 7?" Using the DWP calculated for each roof zone within each of the four scenarios, we calculated the percent increase in DWP per zone. The percent increases in DWP were calculated by dividing the ASCE 7-16 value with the corresponding ASCE 7-10 value for each roof zone. However, because there are 4 roof zones in ASCE 7-16 (and 3 roof zones in ASCE 7-10), both Roof Zones 1' and 1 were divided by the value for ASCE 7-10 Roof Zone 1 to determine the percent increase. Values in the following charts that are below 100% (shaded gray) indicate a reduction in DWP from ASCE 7-10 to 7-16.Percent increases in DWP per roof zone for a big box store in Kansas City, MO that is 24' tall, focusing on Exposure C values.Percent increases in DWP per roof zone for a big box store in Mobile, AL that is 24' tall, focusing on Exposure C values.Percent increases in DWP per roof zone for a 5-story apartment building in Kansas City, MO that is 55' tall, focusing on Exposure C values.Percent increases in DWP per roof zone for a 5-story apartment building in Mobile, AL that is 55' tall, focusing on Exposure C values.For the big box store scenarios, the percent increases in DWP per roof zone varies from 84% to 178%. The percent reductions (values less than 100%) are all in Roof Zone 1' while Roof Zones 1, 2, and 3 have increased DWP. As seen in the Figures, Roof Zone 1 percent increases are greatest while Roof Zone 3 increases are smallest.For the 5-story apartment building scenarios, the percent increases in DWP per roof zone varies from 84% to 177%. The percent increases in Roof Zone 1 are the largest. The percent reductions are all Roof Zone 1'.It is worth noting that the increases in Pressure Coefficients from ASCE 7-10 to 7-16 are, in fact, relatively indicative of the increases in DWP. For more on Pressure Coefficients and the wind design process.The case studies in this blog also show that the 2016 version of ASCE 7 imposes higher DWPs in Roof Zones 1, 2, and 3. However, given some of the substantial reductions in Roof Zone 1', it could be expected that installed roof system capacity may be lower. While that is hopeful, the roofing industry has a minimum-capacity backstop of 60 psf. This means that any calculated DWP at or below 60.0 psf (even for DWP values as low as 23 psf) will have a 60-psf-capacity roof assembly installed to meet building code requirements. The reality is many buildings are required to use a 60-psf-capacity roof system when in fact '60 psf' is more capacity than needed based on calculated DWPs.Let's take a closer look at one subset for each of the 4 scenarios.Example 1: Big Box; Central USThe big box store in KC, MO (Risk Category II, Exposure C) saw the DWP increase from 38 psf to 56 psf in Roof Zone 1 per ASCE 7-10 vs ASCE 7-16; and reduce to 32 psf in Roof Zone 1'. Regardless of the increases or decreases, a 60-psf-capacity roof should be installed in both Roof Zone 1 and Roof Zone 1' per 7-16, which is unchanged relative to ASCE 7-10.Roof zones and pressures for a 24' tall big box store in Kansas City, MO based on ASCE 7-10 using Risk Category II and Exposure C.Roof zones and pressures for a 24' tall big box store in Kansas City, MO based on ASCE 7-16 using Risk Category II and Exposure C.For Roof Zones 2 and 3, the DWPs are not only increased, but the sizes of the roof zones that require higher capacity are also increased. Roof Zone 2 per ASCE 7-10 required a 75-psf-capacity roof, and a 75-psf-capacity roof will be needed per ASCE 7-16. However, approximately 9% of the roof area will need a higher capacity because of the increase in roof zone size. The following chart shows roof area percentages based on the required roof system capacity for this scenario.Chart showing required roof capacity and the roof area (%) where each is required.Example 2: Big Box; Gulf CoastA big box store in Mobile, AL (Risk Category II, Exposure C) saw the DWP increase from 69 psf to 109 psf in Roof Zone 1 per ASCE 7-10 vs ASCE 7-16; and reduce to 63 psf in Roof Zone 1'. A 75-psf-capacity roof should be installed in Roof Zone 1', and higher-capacity roofs will be required in Roof Zones 1, 2, and 3 relative to ASCE 7-10.Roof zones and pressures for a 24' tall big box store in Mobile, AL based on ASCE 7-10 using Risk Category II and Exposure C.Roof zones and pressures for a 24' tall big box store in Mobile, AL based on ASCE 7-16 using Risk Category II and Exposure C.For Roof Zones 1, 2, and 3, the DWPs are not only increased, but the size of the roof zones that require higher capacity are also increased. A larger perimeter roof zone (combining Roof Zones 1 and 2) with higher required capacity is created (relative to 7-10). Approximately 30+% of the roof area will need a higher capacity. The following chart shows roof area percentages based on the required roof system capacity for this scenario.Chart showing required roof capacity and the roof area (%) where each is required.Example 3: 5-story; Central USThe 5-story apartment building in KC, MO (Risk Category II, Exposure C) saw the DWP increase from 45 psf to 66 psf in Roof Zone 1 per ASCE 7-10 vs ASCE 7-16; and reduce to 38 psf in Roof Zone 1'.However, because the method used to determine the sizes of roof zones in ASCE 7-16 is changed, Roof Zones 1' and 1 do not exist on this building! Decreases of DWP in Roof Zone 1' are rendered meaningless, and the lack of a Roof Zones 1' and 1 means the entire roof consists of only Roof Zones 2 and 3, the perimeter and corner roof zones.Roof zones and pressures for a 55' tall apartment building in Kansas City, MO based on ASCE 7-16 (top) and ASCE 7-10 (bottom) using Risk Cat II and Exposure C.The increases in DWPs for the roof zones significantly increase the roof system capacity requirements for this scenario. Almost the entire roof area will need a higher capacity roof. The following chart shows roof area percentages based on the required roof system capacity for this scenario.Chart showing required roof capacity and the roof area (%) where each is required.Example 4: 5-story; Gulf CoastThe 5-story apartment building in Mobile, AL (Risk Category II, Exposure C) saw the DWP increase from 81 psf to 129 psf in Roof Zone 1 per ASCE 7-10 vs ASCE 7-16; and reduce to 74 psf in Roof Zone 1'. Similar to Example 3, due to the size of the roof zones relative to the size of the roof, Roof Zones 1' and 1 do not exist in this scenario.Roof zones and pressures for a 55' tall apartment building in Mobile, AL based on ASCE 7-16 (top) and ASCE 7-10 (bottom) using Risk Cat II and Exposure C.The increases in DWP for the roof zones significantly increase the roof system capacity requirements for this scenario. The entire roof area will need a higher capacity. The following chart shows roof area percentages based on the required roof system capacity for this scenario.Performance versus PrescriptiveThe case studies in this analysis are presented using a performance method for wind design. That is, a specific DWP is determined for each roof zone and a roof system with appropriate capacity is selected for use in the associated roof zone. Another method that is often used in the roofing industry is a prescriptive method for wind design. The DWP for Roof Zone 1 (or Roof Zone 1' in certain localities) is used to select a roof system with an appropriate capacity for Roof Zone 1 (similar to a performance method), and then Roof Zones 2 and 3 use an installation method/layout that is prescriptively increased relative to Roof Zone 1 installation methods. Prescriptive installation methods for Roof Zones 2 and 3 are regularly used with mechanically attached (MA) roof systems, and for MA roofs, Roof Zone 2 increases are commonly 50% and Roof Zone 3 increases are commonly 100%.ConclusionASCE 7-16 DWPs are generally increasing relative to ASCE 7-10, but this impact is better understood by comparing the required roof system capacity for different building types and dimensions in different cities. Looking only at DWPs does not provide enough information; a comparison of required roof system capacities is needed. Not only did the DWPs change, but the methodology for determining the size of the perimeter and corner roof zones changed significantly in the new ASCE 7-16 version; the amount of roof area contained by the perimeter and corner roof zones increased. The case studies—of two buildings less than 60 ft tall in two cities—and corresponding analysis in this blog are just one additional small step to understanding how the ASCE 7-16 will affect wind design over the next decade.

By Authors James R Kirby

February 21, 2021

Sunest on a Retrofit Single Ply Roof System
Building Science

Retrofit Single Ply Roof Systems: Physical Testing

In part 1, Retrofit Single Ply Roof Systems: An Assessment of Wind Resistance, we provided information about the following: Four (4) methods to re-cover a metal panel roof The many options for attaching a single-ply system to a metal panel roof An example calculation for wind uplift design pressures and appropriate fastener patterns that provide the necessary resistance capacity Industry concerns about wind uplift when not attaching the retrofit single-ply system into every purlin In this blog, we will discuss and analyze the four full-scale physical tests that were performed to determine their wind-uplift capacity. Physical Testing There have been no publically available validation studies or data supporting any particular approach to the installation of retrofit single-ply roof systems (RSPRS). Non-validated attachment methods could result in failures during wind events. Therefore, the objective of GAF's physical testing program was to determine the wind-uplift resistance of RSPRS fastened directly into purlins. A variety of fastening patterns and fastener densities were tested in order to provide a better understanding of the effect of wind loads on these systems. The physical testing was performed at the Civil, Architectural and Environmental Engineering Department of the Missouri University of Science and Technology in Rolla, MO (MS&T). Test Roof Construction Four full-scale test roofs were constructed and tested in a 10 ft. wide x 20 ft. long chamber. The test roofs were installed by Missouri Builder Services, Jefferson City, MO, with oversight by GAF. After the test roofs were constructed, the MS&T research team instrumented the assemblies for data collection. The four test roofs consisted of 24 in. wide, 24-gauge structural metal roof panels attached to 16-gauge Z-purlins with concealed expansion clips and purlin screws. The purlins were connected to and supported by horizontal steel channels; the purlin/channel construction was supported by four vertical steel columns. To complete the test specimen, flute fill polyisocyanurate insulation, flat stock polyisocyanurate insulation, and a mechanically attached 60 mil TPO membrane were installed. Prior to membrane installation, the insulation was mechanically attached with minimal fasteners to prevent shifting during the testing. The cross-section shows a graphical representation of the completed RSPRS over the structural metal panel roof system. For Tests #1, #2, and #3, purlin fasteners and 2 3/8 in. barbed fastener plates were used to secure the membrane, simulating a "strapped" installation. The fasteners and plates were not stripped in. For Test #4, purlin fasteners and 3 in. specially-coated induction weld fastener plates were used. The purlins in all tests were attached to C-channels. This did not allow for data collection at a purlin-to-mainframe connection. When an RSPRS is mechanically attached to every other purlin, the load path is altered significantly. This raises a question about the effect on the wind-uplift capacity of the existing metal building when the load path is altered. More information on that topic can be found here. Therefore, it is recommended to engage a structural engineer when altering the load path of an existing structure. Results and Discussion The table shows the ultimate loads achieved, tributary area and load per fastener, as well as fastening method. The term "ultimate load" refers to the point of failure of the roof system during physical testing. Test #1 The fastening pattern for Test #1 was 5 ft. o.c. fastener rows and 12 in. fastener spacing within the row. Test #1 failed when the membrane ruptured simultaneously at seven fastener locations in the center purlin. The system successfully completed 160.1 psf and then failed as the pressure was being increased to 174.5 psf. The membrane pulled over the five center fastener plate locations in an essentially circular pattern along the outer edges of the fastener plates. The outer two failure locations resulted in L-shaped tearing of the membrane, which was attributed to the boundary conditions of the test chamber. The fastener plates were deformed upward. There were many locations of permanent upward membrane deformation. Photo of the outcome of Test #1. The permanent upward membrane deformation was evident along the edges of the rows of fasteners, as can be seen in the upper row of fasteners in the photo. There was very little permanent upward membrane deformation at the centerline between fasteners within a row. This pattern of deformation leads to the belief that the load within the membrane is being transferred from fastener row to fastener row, and not significantly from fastener to fastener within a row. Test #2 The fastening pattern for Test #2 was 5 ft. o.c. fastener rows and 24 in. fastener spacing within the row. Test #2 failed when the membrane ruptured simultaneously at the three central fastener locations in the northern quarter-point row of fasteners. The system successfully completed 116.9 psf and then failed as the pressure was being increased to 124.1 psf. The membrane pulled over the three center fastener plate locations within the row. The center rupture was circular at the fastener plate. The outer two ruptures were "D" shaped; the straight-line edges were attributed to the boundary conditions of the test chamber. Photo of the membrane rupture at the center fastener plate location for Test #2. The tributary area for each fastener for Test #2 was double that of Test #1. This led to the hypothesis that the ultimate load for Test #2 would be one-half of that from Test #1, or 81.4 psf. However, the ultimate load was 119.5 psf, which is approximately 73% of that from Test #1. This is believed to indicate that the membrane transitioned from one-way loading to a more efficient two-way loading. The load was not only distributed across the 5 ft. purlin-to-purlin span (as was the case in Test #1), but was also distributed between fasteners within a row. The uplift loads were pulling on the fastener and fastener plates from all sides (two-way loading) instead of just two sides (one-way loading). During the test, the membrane deflected up approximately 4 in. between fasteners within a row. The loads were more equally distributed within the membrane and around the fastener plate, and therefore, the load per fastener increased from 813.5 lbs. (Test #1) to 1195 lbs. (Test #2). The membrane resisted the uplift loads in two generalized directions: between fastener rows and between fasteners within a row, which aligns with the machine direction (MD) and cross-machine direction (XMD) reinforcement yarns within the membrane, respectively. The membrane had permanent upward deformation between rows and between fasteners within a row because of this two-directional loading. The permanent upward membrane deformation was circular around fasteners. Test #3 The fastening pattern for Test #3 was 5 ft. o.c. fastener rows and 36 in. fastener spacing within the row; fasteners were staggered row to row. Test #3 failed when the membrane ruptured at a single fastener location in the southern quarter-point row of fasteners. The system successfully completed 59.3 psf and then failed as the pressure was being increased to 66.5 psf. The membrane pulled over the center-most fastener plate within the row (at the red circle). The photo shows a close up of the failure location for Test #3. The failure was "D" shaped, similar to failure locations in Test #2. The flat edge was on the boundary edge of the test roofs; the rounded edge is towards the center of the test roof. Similar to Test #2, there was circular upward permanent membrane deformation at fastener locations for Test #3 as shown in Figure 10. This shows that the membrane is being loaded in the MD and XMD. This is due to the relatively wide spacing of the fasteners (2 ft. and 3 ft.) relative to Test #1, which had 1 ft. spacing of fasteners within a row. The tributary area for each fastener for Test #3 was 50% greater than Test #2. This led to the hypothesis that the ultimate load would be 2/3 of Test #2, or about 79.7 psf. However, the ultimate load was 61.9 psf which is approximately 52% of that from Test #2. Comparing Test #3 to Test #1, traditional assumptions based on tributary area would lead to an expected ultimate load for Test #3 to be 1/3 of Test #1. The ultimate load from Test #1 was 162.7 psf, so the expected ultimate load for Test #3 was 54.2 psf. The actual ultimate load for Test #3 was 61.9 psf which is approximately 38% of that from Test #1. While two-direction membrane loading appears to increase the expected ultimate load of a roof system relative to the traditional linear expectation of failure load, it appears there is a limit to this increase. For this series of tests, the limit seems to be 5 ft. o.c. for fastener rows with 24 in. fastener spacing within each row. Test #4 The fastening pattern for Test #4 was 5 ft. o.c. fastener rows and 24 in. fastener spacing within the row; fasteners were staggered row to row and induction welded. Test #4 failed in two locations—a fastener plate pulled over the fastener head and the membrane separated at the reinforcement layer at the adjacent welded fastener plate. The system successfully completed 59.3 psf and then failed as the pressure was being increased to 66.5 psf. The failures occurred in the southern quarter-point row of fasteners. The photo shows the 2 failure locations for Test #4. Test #4 used induction welded fasteners, which means the fastener plates were under the membrane. Therefore, the membrane was cut in order to evaluate each failure. Based on audible observation at the time of failure, the two failures occurred "simultaneously." It was difficult to determine from visual examination which occurred first: the fastener plate pulling over the fastener head or the delamination of the membrane at the fastener plate. Test #4 and Test #2 have the same tributary area per fastener location—10 square feet. However, Test #2 achieved a 119.5 psf ultimate load and Test #4 achieved a 64.8 psf ultimate load. All components were identical for both test roofs except for the fastener/plate combination and that Test #4's fasteners were staggered row-to-row. The above-membrane fastener (e.g., an in-seam fastener) is 2 3/8 in. in diameter. An induction welded fastener plate is 3 in. in diameter and is constructed such that a raised 'ring' surface adheres to the membrane, not the entire fastener plate. The area of a standard 2 3/8 in. above-membrane fastener plate is approximately 4.4 square inches. The area of the attachment surface for an induction welded fastener plate is approximately 3.3 square inches. Therefore, an induction welded fastener plate has approximately 75% of the surface area of a traditional mechanically attached fastener plate to restrain the membrane. Individual fastener load for Test #2 (with the same tributary area as Test # 4) was 1195 lbs. Direct extrapolation to the induction welded fastener plate (at 75%) leads to the predicted value of the fastener load for Test #4 to be 896 lbs. This prediction assumes the reinforcement is the weak link, but the test clearly shows the cap-to-core connection to be the weak link, and therefore, it makes sense that the failure load per fastener for Test #4 was less than 896 lbs. In fact, it was 648 lbs per fastener. The analysis of these two different types of fastening methods and failure modes supports the result that Test #4 has lower wind uplift resistance than Test #2 even though the tributary area for each fastener is the same for Tests #2 and #4. Conclusions and Recommendations Review and analysis of the four full-scale physical tests of retrofit single-ply roof systems installed over structural metal panel roof systems resulted in a number of conclusions. They are as follows: Uplift resistance of RSPRS and individual fastener loads in an RSPRS are based on the membrane's reinforcement strength and one-directional versus two-directional loading of reinforcement. Reducing the overall fastener density increases the tributary area for each fastener. As expected, the ultimate load is reduced with larger tributary areas. Two-directional membrane loading increases the expected ultimate load of a roof system relative to linear extrapolation based on fastener tributary area. However, it appears there is a limit to this expected increase. For this series of tests, the ultimate load exceeded expectations for the Test #2 fastening pattern, but the ultimate load was more in line with traditional linearly extrapolated expectations for the Test #3 fastening pattern. This work emphasizes the limitations of extrapolation and validates the use of physical testing to determine uplift resistance of roof systems. Permanent deformation of the membrane was observed in all four physical tests at the end of testing and was not seen to be a water-tightness issue. The test procedure performed did not determine what pressure during the test cycling the membrane deformation began. This observation may provide an explanation for "wrinkles" observed in mechanically attached membranes that have experienced high wind events. For additional information about this topic, here is the GAF paper that was presented at the 2020 IIBEC Convention and Trade Show, and here is a webinar presented in early 2020.

By Authors James R Kirby

August 03, 2020

Don't miss another GAF RoofViews post!

Subscribe now