Vistas de techos

Ciencia de la construcción

Los beneficios del TPO de 12 pies - Lo que tienes que saber

By Thomas J Taylor

10 de noviembre de 2020

RhinoPlate TPO installation

How Designers & Super Crews Can Maximize Roofing Efficiency

This case study looked at how a roof system designer, working with an expert crew, can both increase roofing efficiency and offer performance advantages to the building owner.

Case Study

Roof Project

Description of Building — The building used for this evaluation was single story big box type, less than 40 feet in height, with a roof area of 125,000 ft2 in a rectangular configuration 290 × 431 ft. The roof was assumed to be a new installation, i.e. new construction or a total roof replacement.

Roof Membrane — Two membranes were evaluated; 10 foot and 12 foot wide TPO. The 12 foot wide sheet has lower wind uplift resistance versus the 10 foot sheet for equivalent mechanical fastener patterns. In general, for wind uplift resistance of I-105 or higher, either induction welded or adhesive attachment would likely be required given common installation components and methods.

Membrane Attachment — Five scenarios were examined:

  • Case 1: 10 ft TPO mechanically attached
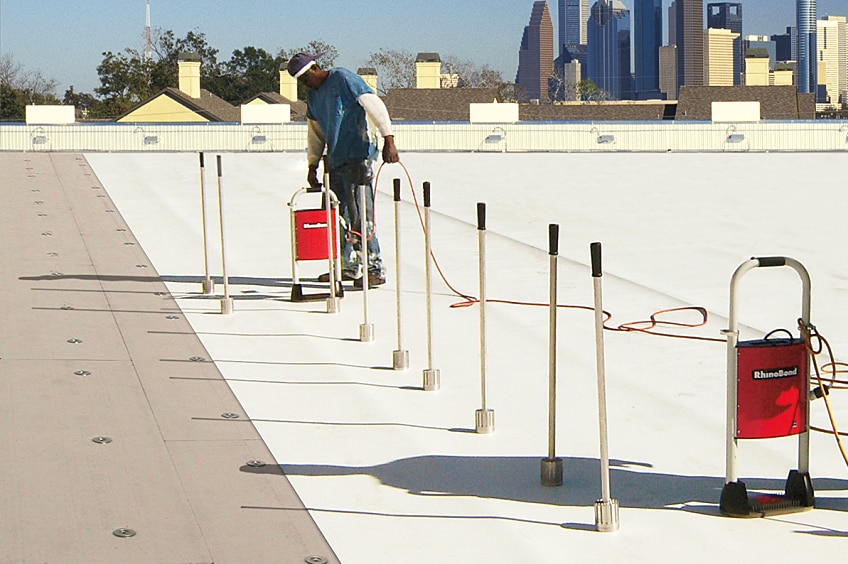
  • Case 2: 12 ft TPO induction welded attachment (RhinoBond)
  • Case 3: 10 ft TPO adhered, using solvent based adhesive
  • Case 4: 12 ft TPO adhered, using solvent based adhesive
  • Case 5: 10 ft TPO induction welded attachment (RhinoBond)

Polyiso Attachment — In each case, the polyiso was mechanically attached.

Fastening Patterns and Membrane Layout — For buildings with widths greater than 200 feet, regardless of height, the following is used to calculate the perimeter size:

The width of the perimeter region is defined as the least of the following two measurements:

0.1 x building width or 0.4 x building height

For this building, 0.1 x 290 = 29.0 ft and 0.4 x 40 = 16 ft. Therefore, the perimeter was set as 16 ft, meaning two boards of polyiso and three TPO half sheets.

The fastening patterns per 4 x 8 ft polyiso board varied by case as shown in the table below from GAF's Architectural Details Handbook:

handbook


Membrane Use — Every roof has its own unique challenges when laying out membrane. Good estimators, crews, and designers are skilled at arranging the membrane sheets to avoid unnecessary waste. For this case study, it was assumed that waste membrane is minimal and that differences between the 10 and 12 ft cases can be ignored. Membrane-use calculations were based on the roof area, and didn't include any parapet walls. All welds were assumed to have 6" overlap.

Fastener Use — For the mechanically attached Case 1, it was assumed that the screws and plates are 6" OC. For the RhinoBond and polyiso attachment, the table above was used.

Results

For each Case, the following were calculated for this 125,000 s.f. roof:

  • Total area of TPO required. This was the roof area plus the area required for edge and end seams.
  • Seam length, i.e. the total number of linear feet for all the seams.
  • Cost of screw and plate fasteners, including insulation fasteners, membrane fasteners, and RhinoBond plates when used.
  • Adhesive cost, based on a traditional solvent based adhesive.

Note that the material costs represent an average and will vary depending on region and job size etc.

Material Cost — The RhinoBond attachment combined with a 12 ft sheet is only slightly more expensive than a 10 ft mechanically attached (MA) sheet and is lower cost than the 10 ft RhinoBond system as shown here:


The difference in material usage is due to the reduced number of seams.

Labor Cost — While labor costs in monetary terms are hard to estimate, due to regional differences in labor rates, quantity of installers, experience levels of crews, etc, comparisons of the number of fasteners and seam lengths can indicate where savings are to be had.

The number of fasteners for each case is shown here:


It's clear that the traditionally low cost mechanical attachment process requires significantly more fasteners than any other approach.

The topic where a 12 ft sheet is expected to do well is in terms of total seam length, shown for each Case below:


As can be seen, Case 1 with its perimeter half sheets has a far longer total seam length than the other systems. Comparing Cases 2 and 4 versus Cases 3 and 5 shows the advantage of a 12 ft sheet. In this case study, it reduced seam length by about 20% compared to a 10 ft. sheet for adhered or RhinoBond attachment.

Overall Material Cost


Super Crew Benefits — the 12 ft. sheets reduce welded seam lengths by about 20%, which improves installation efficiency. However, in combination with RhinoBond a super crew can increase efficiency even more:

  • GAF Architectural Detail 307B allows the crew to use the deck sheet as flashing on walls and curbs when using RhinoBond attachment. This eliminates having to weld all of the wall flashings and some curb flashings, depending on the roof size. The crew no longer has to cut down a roll to be added later to flash in the walls and curbs. This reduces the risk of having to clean the deck membrane and makes it easier to close-in a section of the roof by day's end.


  • An experienced crew of the right size can lay out the membrane to eliminate many of the field hand welding, stop/starts, and angle change welds.
  • When roofing a section of a large roof, the main concern at the end of the day is making sure that section is watertight. Detail 307B enables more squares to be laid and secured by the end of the day. Every component of that section might not be completed but at least it can provide protection against moisture infiltration.

Conclusiones

A 12 ft. TPO membrane combined with RhinoBond attachment offers several advantages:

  • Increased installation efficiency due to reduced seam length, reduced overall TPO use, and fewer fasteners compared to a traditional mechanically attached system.
  • Wind uplift performance is improved as compared with a traditional mechanically attached system, approaching that of adhered systems.
  • Warranty or guarantee length of a RhinoBond system may be longer than a traditional mechanically attached system.
  • Billowing caused by high wind events is significantly reduced or eliminated.


Note — this analysis was for a generalized roof and didn't include considerations of parapet wall areas or penetrations etc. Always do your own calculations and material usage estimates before making decisions about system design.

The author wishes to thank Mark Lienemann of the GAF CARE team for insights provided to this analysis.
About the Author

Thomas J Taylor, PhD trabaja para GAF como asesor de Ciencias de la Construcción y Techado. Tom tiene más de 20 años de experiencia en la industria de productos para la construcción y durante todo ese tiempo ha trabajado para compañías de fabricación. Obtuvo su PhD en Química en la Universidad de Salford, Inglaterra, y tiene aproximadamente 35 patentes. El enfoque principal de Tom en GAF es el diseño del sistema de techos y la reducción del consumo energético en las construcciones. Bajo la guía de Tom, GAF ha desarrollado la TPO con una resistencia inigualable a los factores climáticos.

Artículos relacionados

Dos techistas instalando un revestimiento de silicona para techos en un edificio comercial.
En tu comunidad

Ventajas de los revestimientos de silicona para techos

Como contratista comercial de construcción de techos, usted es responsable de elegir los materiales adecuados para cada trabajo. Con tantas opciones disponibles, tomar una decisión puede resultar una tarea difícil.Cada vez más, los profesionales del sector están optando por los revestimientos de silicona para techos por su fuerza y durabilidad. Este tipo de revestimientos sirve para extender la vida útil de un techo con una estructura firme y, posiblemente, para que los propietarios ahorren tiempo y dinero al retrasar la reparación completa del techo. Además, sus propiedades de restauración funcionan a la perfección con la mayoría de los sistemas comerciales de construcción de techos, como el EPDM, de fieltro, de betún y de metal.¿Qué son los revestimientos de silicona para techos?Los revestimientos de silicona son revestimientos de protección, alto rendimiento e impermeables para techos. Al agregar este revestimiento a un techo con una estructura firme, se puede extender la vida útil del techo existente. La silicona es un componente inorgánico, por lo que mantiene sus propiedades a la intemperie. A su vez, es un material flexible que puede absorber la mayor parte del movimiento normal de un techo a fin de evitar el agrietamiento y la pérdida de sus capacidades de protección.Beneficios de los revestimientos de silicona para techosAdemás de su flexibilidad y su capacidad para extender la vida útil del techo existente, los revestimientos de silicona ofrecen una serie de beneficios. Laura Soder, gerenta sénior de productos líquidos y revestimientos de GAF, explica que los revestimientos de silicona de GAF están diseñados para proteger el techo de filtraciones y ofrecer otras ventajas relacionadas.Protección contra rayos UVEl principal beneficio de los revestimientos de silicona es la protección contra los rayos ultravioleta (UV). "La fórmula de la silicona de GAF incluye dióxido de titanio, lo que ofrece una estabilidad excepcional contra los rayos UV y una reflectancia solar alta", afirma. Esta protección UV ayuda a reducir la temperatura del techo, lo que se traduce en un mejor funcionamiento de las unidades de techo.RentabilidadLos revestimientos de silicona son soluciones rentables que sirven para retrasar el costo de los materiales y la mano de obra necesarios para reemplazar el techo en su totalidad. Funcionan de manera excelente con la mayoría de los techos comerciales y se acoplan especialmente bien con los techos de metal.Restaura el techo existente y extiende su vida útilSoder señala que los revestimientos de silicona se adhieren bien a los techos de metal, lo que los convierte en una excelente opción para extender la vida útil de este tipo de techos. Antes de su aplicación, cepille el óxido ligero o trate específicamente las zonas con más óxido. "Hay muchos techos de metal instalados y, para aquellos que tienen una estructura firme y solo requieren una restauración moderada, se puede agregar con facilidad años de vida útil al techo al revestirlo con silicona", sostiene.Resistente a la humedadLos revestimientos de silicona también son conocidos por su capacidad de resistencia a la humedad. Como la silicona es inorgánica, resiste la degradación en zonas en las que el agua se acumula, lo que la convierte en una opción ideal para áreas con muchas lluvias o nieve.Funciona en climas calurosos y fríosLa silicona tiene un amplio rango de temperaturas en las que se puede aplicar. Al no contener agua, puede aplicarla en temperaturas más bajas que el acrílico y otros revestimientos de techo. Proporciona una capa de impermeabilización monolítica y sin fisuras por encima de los techos de metal existentes. Además, la silicona se contrae y expande junto con el metal en climas fríos y calurosos.En qué se diferencian los revestimientos de silicona de los revestimientos elastoméricosEn comparación con el acrílico y otros revestimientos elastoméricos para techos, la silicona tiene ciertas ventajas.Los acrílicos son revestimientos de protección a base de agua con resistencia a los UV, pero no deben instalarse en lugares donde se acumula el agua, ya que podrían romperse y comenzar a deslaminarse. La silicona es un material que se termina de curar con la humedad, lo que significa que reacciona con la humedad del aire y se seca hasta lograr una película.Soder explica que ambos materiales son flexibles y adecuados para su uso sobre el metal. Pero, si hay agua estancada, el acrílico no es la mejor opción. "Si bien la silicona es más costosa, en general, se degrada a un ritmo mucho más lento que otros revestimientos", sostiene. Ahora bien, una de las desventajas de la silicona en comparación con otros revestimientos elastoméricos para techos es que es resbaladiza cuando está mojada.Recorrido por la instalación y aplicaciónSi bien los revestimientos de silicona pueden extender la vida útil de un techo existente, Soder sostiene que es mejor instalar el revestimiento antes de que finalice la vida útil de la membrana existente.Como las filtraciones suelen ocurrir en las juntas de los techos, puede agregar sellador de silicona en esas zonas. La fórmula de los selladores difiere de la de los revestimientos: en la de los selladores se utilizan otros polímeros de silicona, lo que los vuelve más robustos y pesados. Los selladores de silicona están formulados para las zonas de mucha presión y pueden ayudar a absorber el movimiento en puntos críticos del techo. Funcionan junto a un revestimiento de silicona para la protección del techo.Antes de aplicar cualquier revestimiento, asegúrese de que el techo esté limpio, seco y firme. "Limpio significa libre de contaminantes, polvo, aceites, hojas y otros desechos", explica Soder. Puede usar el concentrado de limpieza de GAF para hidrolavar el techo.Como la silicona se termina de secar con la humedad, el techo debe estar seco antes de aplicarla. Revestir una superficie húmeda puede afectar la adhesión del material y es uno de los errores más grandes que puede cometer en el momento de la instalación. Queremos que el revestimiento comience el proceso de secado por la humedad del aire, no de la humedad en el techo.Cómo aplicar revestimientos de siliconaLa aplicación de un revestimiento de silicona para techos implica cinco pasos:Limpiar los desechos del techo y probar que el revestimiento se adhiera correctamente a la superficie.Asegurarse de que el techo esté firme. Reparar las láminas de metal rotas y reemplazar los sujetadores que falten o estén dañados.Tratar todas las juntas y sujetadores con sellador de silicona, como GAF Silicone Mastic. Se debe aplicar con un cepillo a un grosor de 60 milésimas de pulgada o 1/16 pulgadas mojado.Usar el mismo sellador en los bordes, entradas y drenajes.Por último, aplicar el revestimiento de silicona para techos a todo el techo. Algunos revestimientos, como GAF Unisil Silicone, requieren dos capas, mientras que otros, como GAF High Solids Silicone, necesita solo una.Entender las necesidades de mantenimiento y la durabilidadEl mantenimiento de un revestimiento de silicona para techo es fundamental. Abordar los problemas antes de que se vuelvan más difíciles ayuda a minimizar los costos de las reparaciones y maximizar la vida útil del revestimiento.Como el techo se contrae y expande con el tiempo, se pueden producir algunos problemas con las juntas. Una buena regla de oro es hacer inspeccionar el techo cada seis meses. Aplicar un sellador de silicona puede servir para tratar las zonas con filtraciones o grietas. El sellador de silicona es estable contra los rayos UV y no necesita una capa final, según Soder.Agregar revestimientos de silicona para techos a la caja de herramientasCon tantos beneficios, los revestimientos de silicona para techos deberían ser la primera opción en los proyectos de planificación de restauración del techo. Además, al tener tantas opciones disponibles, puede elegir el tipo que sea mejor para cada tipo de techo en el que trabaje. ¿Tiene más preguntas sobre los revestimientos para techos? Los representantes del servicio técnico de GAF estarán encantados de asistirle con su nuevo proyecto de revestimiento.

Autor: Mark Soto​​​​​​​

19 de noviembre de 2024

Two roofers installing a silicone roof coating on a commercial building.
Techos comerciales

Las ventajas de los revestimientos de silicona para techos

Como contratista de techado comercial, eres responsable de elegir los materiales adecuados para cada trabajo. Pero con tantas opciones disponibles, tomar una decisión puede ser complicado. Los profesionales de la industria recurren cada vez más a los revestimientos de silicona para techos por su resistencia y durabilidad. Estos revestimientos pueden ayudar a prolongar la vida útil de un techo estructuralmente sólido y, potencialmente, ahorrar tiempo y dinero a los propietarios al retrasar la renovación total del techo. Además, sus propiedades restaurativas funcionan a la perfección con la mayoría de los sistemas de techos comerciales, como los techos EPDM, multimembrana y de betún y metal. ¿Qué son los revestimientos de silicona para techos? Los revestimientos de silicona son revestimientos de alto rendimiento e impermeables que protegen los techos. La aplicación de este revestimiento a un techo estructuralmente sólido favorece la prolongación de la vida útil del techo existente. Al ser inorgánica, la silicona mantiene sus propiedades en condiciones meteorológicas adversas. Además, es flexible y absorbe la mayor parte del movimiento normal del techo para evitar que se agriete y pierda sus propiedades protectoras. Beneficios de los revestimientos de silicona para techos Además de ser flexibles y prolongar la vida útil del techo existente, los revestimientos de silicona ofrecen muchos otros beneficios. Laura Soder, gerenta sénior de productos líquidos y revestimientos de GAF, explica que los revestimientos de silicona de GAF están diseñados para ayudar a proteger contra fugas y proporcionar beneficios relacionados. Protección contra los rayos UV El principal beneficio de los revestimientos de silicona es la protección contra los rayos ultravioleta (UV). "La silicona de GAF está formulada con dióxido de titanio, que aporta una excepcional estabilidad frente a los rayos UV y una alta reflectancia solar", sostiene. Esta protección UV ayuda a reducir las temperaturas de los techos, lo cual puede favorecer un funcionamiento más eficaz de las unidades de climatización instaladas allí instaladas. Rentable Los revestimientos de silicona son soluciones rentables que pueden ayudar a postergar el costo de materiales y mano de obra que se requieren para reemplazar todo el techo. Funcionan muy bien con la mayoría de los techos comerciales y combinan de maravilla con los techos de metal. Restauran y ayudan a prolongar la vida útil del techo existente Soder señala que los revestimientos de silicona se adhieren bien a los techos de metal, lo que los convierte en un método excelente para prolongar la vida útil de los techos de metal. Antes de la aplicación, cepilla el óxido más ligero o aplica un tratamiento localizado al óxido más pesado. "Hay muchos techos de metal hoy en día, y para aquellos que son estructuralmente sólidos y solo requieren una restauración moderada, se puede prolongar su vida útil con facilidad, recubriéndolos con silicona", afirma. Resistentes a la humedad Los revestimientos de silicona también son conocidos por su capacidad de ser resistentes a la humedad. Dado que la silicona es inorgánica, resiste la degradación en áreas donde se acumula agua, lo que la convierte en una opción ideal en zonas expuestas a la lluvia o la nieve. Funciona en climas cálidos y fríos La silicona tiene un amplio rango de temperaturas de aplicación. Como es un material que no contiene agua, permite aplicarlo en temperaturas más bajas que el acrílico y otros revestimientos para techos. Aporta una capa de impermeabilización monolítica y sin imperfecciones sobre los techos de metal existentes. La silicona también se flexiona con el metal en climas fríos y cálidos. Comparación de la silicona con los revestimientos elastoméricos En comparación con los revestimientos acrílicos y otros revestimientos elastoméricos para techos, la silicona tiene sus ventajas. Los acrílicos son revestimientos protectores a base de agua con resistencia a los rayos UV, pero no deben instalarse en lugares donde se acumule agua, ya que pueden descomponerse y empezar a desprenderse. La silicona es un material que se cura con la humedad. Esto quiere decir que reacciona con la humedad del aire y se cura hasta formar una película de acabado. Soder explica que ambos materiales son flexibles y apropiados para su uso sobre metal. Pero si hay agua estancada, el acrílico no es la mejor opción. "Si bien la silicona es más costosa, suele desgastarse a un ritmo mucho más lento que otros revestimientos", afirma. Dicho esto, uno de los inconvenientes de la silicona en comparación con otros revestimientos elastoméricos para techos es que es resbaladiza cuando está mojada. Cómo instalar y aplicar Si bien los revestimientos de silicona pueden ayudar a prolongar la vida útil de un techo existente, Soder señala que es mejor instalar el revestimiento antes de que se agote la vida útil de la membrana existente. Dado que las fugas tienden a producirse en las juntas del techo, aplique sellador de silicona en estas áreas. Los selladores se formulan de forma diferente a los revestimientos: utilizan distintos polímeros de silicona que les otorga una consistencia más densa y una estructura más duradera. Los selladores de silicona están formulados para zonas de gran exigencia y ayudan a absorber el movimiento en puntos críticos del techo. Trabajan codo con codo con un revestimiento de silicona para proteger el techo. Antes de aplicar cualquier tipo de revestimiento, es fundamental asegurarse de que el techo esté limpio, seco y en buen estado. "Limpio significa sin contaminantes, polvo, aceites, hojas ni otros residuos", dice Soder. Una alternativa es utilizar el concentrado de limpieza GAF para lavar el techo a presión. Dado que la silicona se cura con la humedad, el techo debe estar seco antes de aplicarla. Aplicar el revestimiento sobre una superficie húmeda puede afectar la adherencia; uno de los principales errores al instalar. Es recomendable que el revestimiento inicie el proceso de curado a partir de la humedad del aire, no de la humedad del techo. Cómo aplicar revestimientos de silicona La aplicación de un revestimiento de silicona para techos consta de cinco pasos: Limpiar los residuos del techo y verificar que el revestimiento se adhiera correctamente a la superficie. Asegurarse de que el techo esté en buenas condiciones. Reparar las láminas de metal rotas y reemplazar los sujetadores faltantes o dañados. Tratar todas las juntas y sujetadores con sellador de silicona como la masilla de silicona GAF. Aplicar a 60 mils o 1/16 pulgadas de espesor húmedo con una brocha. Utilizar el mismo sellador en los bordes, penetraciones y drenajes. Por último, aplicar el revestimiento de silicona para techos a toda la superficie. Algunos revestimientos, como la silicona Unisil de GAF, requieren dos capas, mientras que es posible que otros, como la silicona de altos sólidos de GAF, solo necesiten una. Comprender las necesidades de mantenimiento y la longevidad El mantenimiento en un revestimiento de silicona para techos es esencial. Tratar los problemas antes de que aparezcan puede ayudar a minimizar el costo de las reparaciones y maximizar la vida útil del revestimiento. A medida que el techo se vaya flexionando con el tiempo, podrían surgir problemas con las juntas. Una buena práctica es hacer inspeccionar el techo cada seis meses. La aplicación de un sellador de silicona es una solución posible para áreas con fugas o grietas. El sellador de silicona es estable ante los rayos UV y no requiere un revestimiento superior, según Soder. Cómo añadir revestimientos de silicona para techos a su caja de herramientas Debido a los numerosos beneficios que ofrecen, los revestimientos de silicona para techos deberían ser una prioridad a la hora de planificar proyectos de restauración de techos. Además, con la amplia variedad de opciones disponibles, es posible elegir el mejor tipo para cada techo. ¿Tienes más preguntas sobre los revestimientos para techos? Los representantes del servicio técnico de GAF estarán encantados de ayudarte en tu próximo proyecto de revestimiento.

Autor: Mark Soto​​​​​​​

15 de octubre de 2024

Installation of ISO Board and TPO on a Roof
Ciencia de la construcción

Aislante para techos: una inversión positiva para reducir el carbono total

¿Alguna vez has pensado en que los productos de construcción pueden reducir las emisiones de dióxido de carbono de tu edificio? When considered over their useful life, materials like insulation decrease total carbon emissions thanks to their performance benefits. Read on for an explanation of how this can work in your designs.What is Total Carbon?Total carbon captures the idea that the carbon impacts of buildings should be considered holistically across the building's entire life span and sometimes beyond. (In this context, "carbon" is shorthand for carbon dioxide (CO2) emissions.) Put simply, total carbon is calculated by adding a building's embodied carbon to its operational carbon.Total Carbon = Embodied Carbon + Operational CarbonWhat is Embodied Carbon?Embodied carbon is comprised of CO2 emissions from everything other than the operations phase of the building. This includes raw material supply, manufacturing, construction/installation, maintenance and repair, deconstruction/demolition, waste processing/disposal of building materials, and transport between each stage and the next. These embodied carbon phases are indicated by the gray CO2 clouds over the different sections of the life cycle in the image below.We often focus on "cradle-to-gate" embodied carbon because this is the simplest to calculate. "Cradle-to-gate" is the sum of carbon emissions from the energy consumed directly or indirectly to produce the construction materials used in a building. The "cradle to gate" approach neglects the remainder of the embodied carbon captured in the broader "cradle to grave" assessment, a more comprehensive view of a building's embodied carbon footprint.What is Operational Carbon?Operational carbon, on the other hand, is generated by energy used during a building's occupancy stage, by heating, cooling, and lighting systems; equipment and appliances; and other critical functions. This is the red CO2 cloud in the life-cycle graphic. It is larger than the gray CO2 clouds because, in most buildings, operational carbon is the largest contributor to total carbon.What is Carbon Dioxide Equivalent (CO2e)?Often, you will see the term CO2e used. According to the US Environmental Protection Agency (EPA), "CO2e is simply the combination of the pollutants that contribute to climate change adjusted using their global warming potential." In other words, it is a way to translate the effect of pollutants (e.g. methane, nitrous oxide) into the equivalent volume of CO2 that would have the same effect on the atmosphere.Today and the FutureToday, carbon from building operations (72%) is a much larger challenge than that from construction materials' embodied carbon (28%) (Architecture 2030, 2019). Projections into 2050 anticipate the operations/embodied carbon split will be closer to 50/50, but this hinges on building designs and renovations between now and 2050 making progress on improving building operations.Why Insulation?Insulation, and specifically continuous insulation on low-slope roofs, is especially relevant to the carbon discussion because, according to the Embodied Carbon 101: Envelope presentation by the Boston Society for Architecture: Insulation occupies the unique position at the intersection of embodied and operational carbon emissions for a building. Insulation is the only building material that directly offsets operational emissions. It can be said to pay back its embodied carbon debt with avoided emissions during the building's lifetime.A Thought Experiment on Reducing Total CarbonTo make progress on reducing the total carbon impact of buildings, it is best to start with the largest piece of today's pie, operational carbon. Within the range of choices made during building design and construction, not all selections have the same effect on operational carbon.When making decisions about carbon and energy reduction strategies, think about the problem as an "investment" rather than a "discretionary expense." Discretionary expenses are easier to reduce or eliminate by simply consuming less. In the example below, imagine you are flying to visit your client's building. Consider this a "discretionary expense." The input on the far left is a given number of kilograms of carbon dioxide equivalent (CO2e) generated for the flight, from the manufacturing of the airplane, to the fuel it burns, to its maintenance. The output is the flight itself, which creates CO2 emissions, but no durable good. In this case, the only CO2 reduction strategy you can make is to make fewer or shorter flights, perhaps by consolidating visits, employing a local designer of record, or visiting the building virtually whenever possible. Now consider the wallpaper you might specify for your client's building. It involves a discretionary expenditure of CO2e, in this case, used to produce a durable good. However, this durable good is a product without use-phase benefits. In other words, it cannot help to save energy during the operational phase of the building. It has other aesthetic and durability benefits, but no operational benefits to offset the CO2 emissions generated to create it. Your choices here are expanded over the previous example of an airplane flight. You can limit CO2 by choosing a product with a long useful life. You can also apply the three Rs: reduce the quantity of new product used, reuse existing material when possible, and recycle product scraps at installation and the rest at the end of its lifespan. In the final step in our thought experiment, consider the insulation in your client's building. As before, we must generate a certain amount of CO2e to create a durable good. In this case, it's one with use-phase benefits. Insulation can reduce operational energy by reducing heat flow through the building enclosure, reducing the need to burn fuel or use electricity to heat and cool the building. The good news is that, in addition to the other strategies considered for the flight and the wallpaper, here you can also maximize operational carbon savings to offset the initial embodied carbon input. And, unlike the discretionary nature of some flights and the often optional decision to use furnishings like wallpaper, heating and cooling are necessary for the functioning of almost all occupied buildings.Based on this example, you can consider building products with operational benefits, like insulation, as an "investment." It is appropriate to look at improving the building enclosure and understanding what the return on the investment is from a carbon perspective. As the comparison above demonstrates, if you have a limited supply of carbon to "invest", putting it into more roof insulation is a very smart move compared to "spending" it on a discretionary flight or on a product without use-phase carbon benefits, such as wallpaper.This means we should be careful not to measure products like insulation that save CO2e in the building use-phase savings only by their embodied carbon use, but by their total carbon profile. So, how do we calculate this?Putting It to the TestWe were curious to know just how much operational carbon roof insulation could save relative to the initial investment of embodied carbon required to include it in a building. To understand this, we modeled the US Department of Energy's (DOE) Standalone Retail Prototype Building located in Climate Zone 4A to comply with ASHRAE 90.1-2019 energy requirements. We took the insulation product's embodied energy and carbon data from the Polyisocyanurate Insulation Manufacturers Association's (PIMA) industry-wide environmental product declaration (EPD).To significantly reduce operational carbon, the largest carbon challenge facing buildings today, the returns on the investment of our building design strategies need to be consistent over time. This is where passive design strategies like building enclosure improvements really shine. They have much longer service lives than, for example, finish materials, leading to sustained returns.Specifically, we looked here at how our example building's roof insulation impacted both embodied and operational carbon and energy use. To do this, we calculated the cumulative carbon savings over the 75-year life of our model building. In our example, we assumed R-30 insulation installed at the outset, increased every 20 years by R-10, when the roof membrane is periodically replaced.In our analysis, the embodied CO2e associated with installing R-30 (shown by the brown curve in years -1 to 1), the embodied carbon of the additional R-10 of insulation added every 20 years (too small to show up in the graph), and the embodied carbon represented by end-of-life disposal (also too small to show up) are all taken into account. About five months after the building becomes operational, the embodied carbon investment of the roof insulation is dwarfed by the operational savings it provides. The initial and supplemental roof insulation ultimately saves a net of 705 metric tons of carbon over the life of the building.If you want to see more examples like the one above, check out PIMA's study, conducted by the consulting firm ICF. The research group looked at several DOE building prototypes across a range of climate zones, calculating how much carbon, energy, and money can be saved when roof insulation is upgraded from an existing baseline to current code compliance. Their results can be found here. Justin Koscher of PIMA also highlighted these savings, conveniently sorted by climate zone and building type, here.Support for Carbon Investment DecisionsSo how can you make sure you address both operational and embodied carbon when making "carbon investment" decisions? We've prepared a handy chart to help.First, when looking at lower-embodied-carbon substitutions for higher-embodied-carbon building materials or systems (moving from the upper-left red quadrant to the lower-left yellow quadrant in the chart), ensure that the alternatives you are considering have equivalent performance attributes in terms of resilience and longevity. If an alternative material or system has lower initial embodied carbon, but doesn't perform as well or last as long as the specified product, then it may not be a good carbon investment. Another consideration here is whether or not the embodied carbon of the alternative is released as emissions (i.e. as part of its raw material supply or manufacturing, or "cradle to gate" stages), or if it remains in the product throughout its useful life. In other words, can the alternative item be considered a carbon sink? If so, using it may be a good strategy.Next, determine if the alternative product or system can provide operational carbon savings, even if it has high embodied energy (upper-right yellow quadrant). If the alternative has positive operational carbon impacts over a long period, don't sacrifice operational carbon savings for the sake of avoiding an initial embodied product carbon investment when justified for strategic reasons.Last, if a product has high operational carbon savings and relatively low embodied carbon (lower-right green quadrant), include more of this product in your designs. The polyiso roof insulation in our example above fits into this category. You can utilize these carbon savings to offset the carbon use in other areas of the design, like aesthetic finishes, where the decision to use the product may be discretionary but desired.When designing buildings, we need to consider the whole picture, looking at building products' embodied carbon as a potential investment yielding improved operational and performance outcomes. Our design choices and product selection can have a significant impact on total carbon targets for the buildings we envision, build, and operate.Click these links to learn more about GAF's and Siplast's insulation solutions. Please also visit our design professional and architect resources page for guide specifications, details, innovative green building materials, continuing education, and expert guidance.We presented the findings in this blog in a presentation called "Carbon and Energy Impacts of Roof Insulation: The Whole[-Life] Story" given at the BEST6 Conference on March 19, 2024 in Austin, Texas.References:Architecture 2030. (2019). New Buildings: Embodied Carbon. https://web.archive.org/web/20190801031738/https://architecture2030.org/new-buildings-embodied/ Carbon Leadership Forum. (2023, April 2). 1 - Embodied Carbon 101. https://carbonleadershipforum.org/embodied-carbon-101/

By Authors Elizabeth Grant

18 de septiembre de 2024

¡No te pierdas otra publicación de GAF RoofViews!

Subscribe now